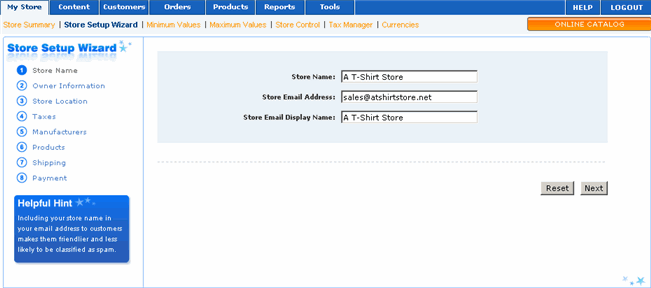
The Store Setup Wizard walks you through the steps you need to take to create your store and get it online.
The Setup Wizard displays automatically the first time you access the Merchant Manager Administration console. After the initial setup, you can either return to the Wizard to make changes or go directly to the appropriate section of the administration manager.
You can also access it at any time to change your store settings by selecting My Store in the menu and then clicking Store Setup Wizard.

|
1 |
In the Store Name field, enter the name for your store. This is the name that will display to your store's visitors. To demonstrate, we use the fictional store, "A T-Shirt Store". |
|
2 |
In the Store Email field, enter the email address for your store. |
|
3 |
Enter the Store Email Display Name. |
|
4 |
Click Next. The owner information page appears. |
|
1 |
In the Owner Name field, enter the name of the store owner. |
|
2 |
In the Owner Email field, enter an email address for the store owner. |
|
3 |
In the Order CC Email address field, enter an email address to which orders will be sent. |
|
4 |
Click Next. The store location page appears. |
|
1 |
Enter the physical address of your company. |
|
2 |
Click Next. The tax page appears. |
|
|
As of version 4, you can specify a separate shipping address in addition to the store location address. The separate shipping address is only used for calculation of shipping rates for an order. To enter a separate location for the shipping address, after you enter the Store Location address, select the "I have a separate shipping location checkbox" and click the Next button. Enter the information for your shipping location, and click the Next button. |
|
1 |
We begin by creating a new tax class called "Geographic", a class for which all geographic regions will be applied. |
||
|
2 |
Click Add. |
||
|
3 |
Generally, online stores charge sales tax only to residents of the state in which your company is located. Since our fictitious store is located in Illinois, let's create a region called Illinois.
Select the country (US), state (Illinois), and leave Zip blank (since we want to apply the same rate to all of Illinois).
|
||
|
|
|
||
|
4 |
Click Save and Continue. |
||
|
5 |
Enter the appropriate tax rate. In our example, we enter the sales tax rate for Illinois. |
||
|
6 |
Click Continue. |
||
|
7 |
You now see a summary of the new tax class. |
||
|
8 |
Click Continue to proceed to STEP 5: Manufacturers, or click Add Another Tax to add another tax class. |
||
|
|
|
||
|
9 |
For more detailed instructions, please reference Setting Up Taxes. |
|
1 |
Depending upon the types of product you sell, your customers may be interested in searching for products by manufacturer or in knowing who has manufactured a product before purchasing it. To define a new manufacturer, click Insert. |
|
2 |
Enter the name of the manufacturer, the location of the manufacturer's logo in your computer (optional), and its Website URL. Click Save. |
|
3 |
Insert additional manufacturers or click Next to continue. |
|
4 |
For further instructions, please reference Defining Manufacturers. |
|
1 |
To begin, create a new product category by entering the name of the category, locating its associated image (optional), entering its code, and selecting the sort order of this category (as it appears on the storefront). |
|
2 |
Click Add. |
|
3 |
Now create new product(s) to associate with this category. |
|
4 |
Once all products have been added, click Next. |
|
5 |
Please reference Adding and Editing Products if you need further instructions. |
|
1 |
Select the shipping module(s) you wish to install, click Install, then Edit and enter the appropriate information. (If it's already installed, then directly click Edit.) |
|
2 |
Select all other shipping modules you wish to make available to your customers and follow the same instructions. |
|
3 |
Once all necessary modules have been configured, click Next. |
|
4 |
Please reference Working with Shipping Modules if you need further instructions. |
|
1 |
Select the payment module(s) you wish to install, click Install, then Edit and enter the appropriate information. (If already installed, then directly click Edit.) |
|
2 |
Once all necessary modules have been configured, click Done. |
|
3 |
Please reference Installing and Configuring Payment Modules if you need further instructions. |
|
4 |
The Store Setup Wizard has now been configured. However, you can return to the Wizard at any time to edit your edit your settings (or go directly to the appropriate administration menu section.) |
