Add a new product
Merchant Manager enables you to quickly add new products to your store. You can add products to any of the categories and include a product in multiple categories.
If information about a product changes, you can update that information and have the changes display in your store immediately.
|
|
If you already have a set of products to use in database form, then please use the Import tool. |
![]() To add a new product to your store:
To add a new product to your store:
|
1 |
In the menu, select Products. A list of all your top level categories and products displays. |
|
2 |
First, it's important to note the tree structure of the Catalog. Be cognizant of the branch under which you wish to work. |
|
3 |
To add a new product, click the Add Product button connected to the appropriate main category or sub-category. To add it to a sub-category (e.g. Pants), expand the main category (e.g. Clothing) by clicking its "+" button, expand the sub-category by clicking its "+" button, and click the Add Product button within this branch. |
|
4 |
Complete the following fields as appropriate: |
|
|
- Name. Enter name of the product. |
|
|
- Description. Optional. Provide a description of the product. You can also use the Advanced HTML Editor. |
|
|
- URL. Optional. You can enter the URL to a Web page with more information on this product. |
|
|
- Meta Keywords. Optional. You can enter in meta keywords here for the purposes of search engine optimization. See SEO and SEO for specific sections for more information. |
|
|
- Meta Description. Optional. You can enter in meta description information here for the purposes of search engine optimization. See SEO and SEO for specific sections for more information. |
|
|
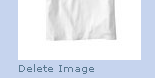
- Image. Optional. Click Browse to use the Image Browser to upload an image that represents this product. NOTE: There is a link that appears below the image that allows you to delete an image:
|
|
|
- Thumbnail. Optional. Click Browse to upload a thumbnail size image of this product. |
|
|
- Manufacturer. Optional. Select from the drop-down list of all the manufacturers you have defined. |
|
|
- Price. Enter the price of the product. You can also assign additional pricing for particular customer groups. |
|
|
- Model |
|
|
- Recurring Price. If the product is a subscription-based product, enter the recurring price here. |
|
|
- Recurring Interval. If the product is a subscription-based product,enter the recurring interval here, which is how often the customer will be charged for the subscription. |
|
|
- Tax Class. Select the tax class from the list of classes you have defined. See Setting Up Tax Zones. |
|
|
- Weight. Optional. NOTE: Entering a zero will result in free shipping. Free shipping is turned off by default when creating new products. In areas where metric measurements are used (ex: European Union countries and the UK), you can enter weight in kilograms and grams. Note that pounds is the default option.
|
|
|
- Current Category. |
|
|
- Display As A New Product. Select the Display As A New Product check box if you want the product to display in the New Products section of your online store. |
|
|
This product will display for You can select the number of days that you want the new product to display in the This product will display for ? days check box. |
|
|
- Sort Order. As of version 4, products can be assigned a numerical sort order. Entering a 1 for product A and a 2 for product B would place product A "higher" on the list. |
|
5 |
Click the box next to Disabled if you wish to deactivate this product (and make it therefore invisible to shoppers). |
|
6 |
Click Insert to add this product to your catalog. You now need to edit this product. |
|
1 |
On the menu, select Products. A list of all your top level categories and products displays. |
|
2 |
Click the product. |
|
3 |
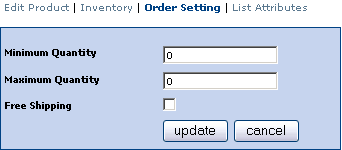
Enter new values in the fields as necessary. NOTE: In the Edit screen, the Current Category field displays the category a product is currently associated with. A product can be re-assigned to a different category here if desired. Meta Keywords and Meta Description title tags were introduced in Merchant Manager 4.5 to improve search engine optimization. Near the top you now see additional navigation options: Edit Product,Inventory, Order Settings andList Attributes. |
|
4 |
In the Inventory page, enter a number for Quantity. This should, of course, match the actual amount of the product available in your warehouse. If the product is not yet available in your warehouse but you do expect to sell it and wish to list it on the store, then set the Date Expected on which the product will be ready for shipping. The date will be visible to your customers and depending on your Stock Settings they even pre-order it. You can also track your inventory by Attribute. When you check the radio button next to Attribute, all the text fields gray out except for the Date Expected text field. Enter the Date Expected and then clickUpdate if you want to track your inventory by the product attribute. |
|
5 |
In the Order Setting page,
you can set minimum and maximum quantities, and choose to enable free shipping for the product. |
|
6 |
Click Update to save any changes. |
A product can appear in multiple categories. For example, you might have a book that you want to include in both the Fiction and the Bestsellers category. Instead of creating two instances of this product, you can create a duplicate of it and automatically put it in another category.
|
1 |
In the menu, select Products. A list of all your top level categories and products displays. |
|
2 |
Click the product. |
|
3 |
In the Edit Product page, click Copy near the bottom. |
|
4 |
You are prompted to choose the other category to which this product belongs.
|
|
5 |
Select the category by using the drop-down menu. |
|
6 |
By default, the Copy action will make a duplicate of the product and add it to the new catalog. If, however, you do not wish to create a duplicate of the product and rather link it to another category, then click the box next to Link Only. Link product. Does not create a separate product. This will be the same product, just shown in two categories. If you edit one instance, the other instance is updated automatically as well. Please note that if you delete the product from either the original or linked category, it will be deleted from the other as well. Duplicate product. Creates a separate and distinct product with the same names and properties. You can edit this product separately from the one you are duplicating. |
|
7 |
Click Copy. |
|
1 |
On the menu, select Products. A list of all your top level categories and products displays. |
|
3 |
Click the product you want to delete and then click Delete. |
|
4 |
Click Delete again to confirm. The product is immediately removed from your store. |