Each Exchange mailbox includes a free copy of Outlook, which you can download and configure automatically by clicking on the Download Outlook/Entourage link on the MS Exchange management section in SiteControl. You can also configure a copy of Outlook 2007 that is already on your computer.
|
1
|
You must first make certain to have created an Exchange mailbox. Please note that it may take 10-15 minutes for a new mailbox to become active, so please wait before moving to Step 2.
|
|
2
|
The Autodiscover method is a means by which your Outlook can be automatically configured without the use of the script files
|
|
3
|
If Outlook is currently running, then please close it now.
|
|
4
|
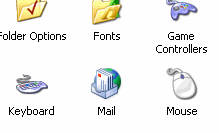
On your computer, click the Start button, select Control Panel, and then open Mail by double-clicking.
|
|
5
|
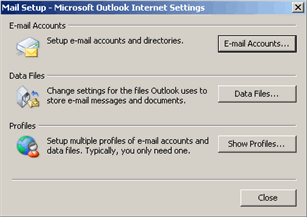
In the Mail Setup dialog box, click Show Profiles.
|
|
6
|
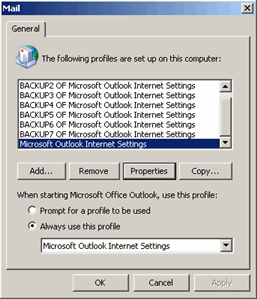
Unless you have a specific need for a new profile, we suggest selecting the default one called Microsoft Outlook Internet Settings. Once selected, click Properties.
|
|
7
|
Next, click Email Accounts.
|
|
8
|
In the Account Settings window, click New (directly underneath the E-mail tab).
|
|
9
|
Now type Your Name (e.g. Mary Doe), the Exchange mailbox e-mail address and its password. Click Next.
|
|
10
|
Outlook will now establish a connection to the Exchange server, which in turn will send to your Outlook all the necessary configuration settings automatically.
|
|
11
|
Launch Outlook.
|
|
1
|
You must first make certain to have created a Mailbox. Please note that it may take 10-15 minutes for a new mailbox to become active, so please wait before moving to Step 2.
|
|
2
|
Autodiscover is the preferred method, but if for some reason it fails, then please proceed with the Manual method below.
|
|
3
|
If Outlook is currently running, then please close it now.
|
|
4
|
On your computer, click the Start button, select Control Panel, and then open Mail by double-clicking.
|
|
5
|
In the Mail Setup dialog box, click Show Profiles.
|
|
6
|
Unless you have a specific need for a new profile, we suggest selecting the default one called Microsoft Outlook Internet Settings (or simply Outlook). Once selected, click Properties.
|
|
7
|
Next, click Email Accounts.
|
|
8
|
In the Account Settings window, click New (directly underneath the E-mail tab).
|
|
9
|
Now type Your Name (e.g. Mary Doe), the Exchange mailbox e-mail address and its password.
|
|
10
|
Check the box next to Manually configure server settings or additional server types.
Click Next.
|
|
11
|
Select the radio button next to Microsoft Exchange.
Click Next.
|
|
12
|
In The Microsoft Exchange Server field, please enter UC-EXMBX02Outlook.UC2.Chicago.Hostway
Check the box next to Use Cached Exchange Mode, and then enter the email address of the Exchange mailbox user.
Click More Settings. If you are prompted with a message indicating that Exchange is not available, then simply click OK and proceed.
NOTE: Do NOT click the Check Name button. Furthermore, if you are prompted with another Check Name message window after clicking More Settings, then click Cancel.
|
|
13
|
In the More Settings window, click the Connections tab.
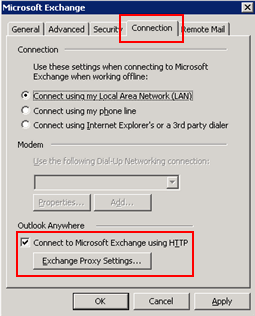
Check the box next to Connect to Microsoft Exchange using HTTP.
Click Exchange Proxy Settings...
|
|
14
|
In Exchange Proxy Settings window, enter the settings as you see below:
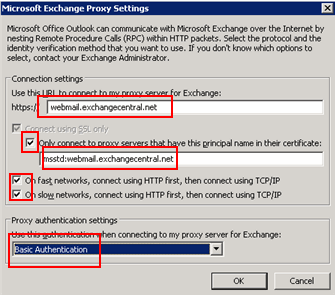
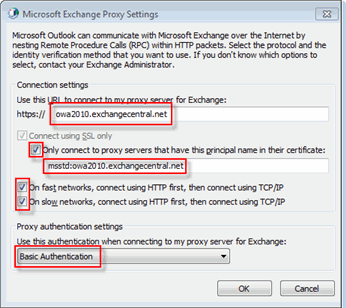
In the Use this URL to connect... field, enter: webmail.exchangecentral.netowa2010.exchangecentral.net
If it isn't already checked, then check the box next to Connect using SSL only.
Check the box next to Only connect to proxy server (or sometimes indicated as Mutually authenticate the session), and then enter in its field: msstd:webmail.exchangecentral.netmsstd:owa2010.exchangecentral.net
Make sure both On fast networks... and On slow networks... options are checked.
Using the drop-down menu under Proxy authentication settings, select Basic Authentication.
Click OK.
|
|
15
|
Click OK again.
|
|
16
|
Click Next.
|
|
17
|
You will be prompted to enter the Exchange mailbox username and password.
Click OK.
|
|
18
|
Continue to click OK and Finish until all related windows are closed.
|
|
19
|
Launch Outlook.
|
|
20
|
You will be prompted to enter the user's login info again.
|
|
21
|
You should now see this prompt:
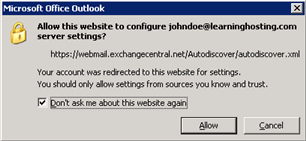
Check Don't ask me about this website again.
Click Allow.
|
|
22
|
If your Outlook closed, then launch again.
|