Exchange 2010 users have the ability to remotely store old and infrequently-accessed e-mail for archival and space-saving purposes, and retain mailbox items (e-mail, calendar entries, tasks, etc) that have been edited or deleted for legal and compliance purposes.
![]() Features & Benefits
Features & Benefits
![]() Activation
Activation
![]() Usage and Management (Outlook Web Access and Outlook)
Usage and Management (Outlook Web Access and Outlook)
![]() Legal Hold and Discovery (Exchange administrators only)
Legal Hold and Discovery (Exchange administrators only)
Archiving
Access and manage archives directly in Outlook Web App (OWA) and Outlook 2010.
Improve performance of Outlook 2010 (for users with very large collection of e-mail messages) by moving the bulk of older e-mail messages to the archive.
Create or change policies that dictate the manner in which the archive operates, including automation.
Use it without disk space or time limitations and in turn reduce storage costs.
Retention (Legal Hold & Discovery)
Search across multiple end-user mailboxes at once.
Set role-specific rights to Exchange account administrators and compliance officers.
Monitor user e-mail content to enforce HR policies and other mandates.
Up to 7-year retention period.
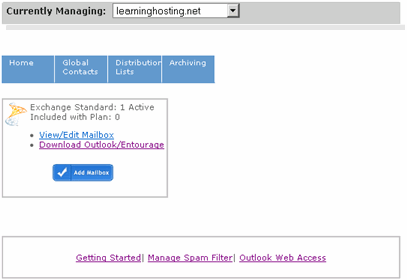
SiteControl
Log in to SiteControl and navigate to the Exchange 2010 section.
Click Archiving.
Check the box next to the mailbox for which you wish to activate archiving and click Purchase Archiving.
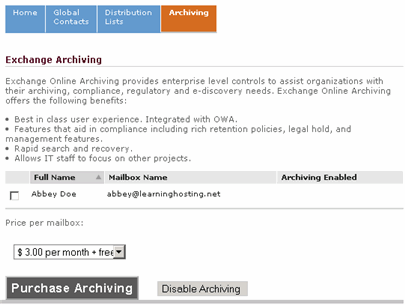
Confirm the purchase on subsequent pages.
Outlook Web App (OWA) and Enabling Retention Policies
Log in to OWA. If you haven't used OWA, more information can be found here.
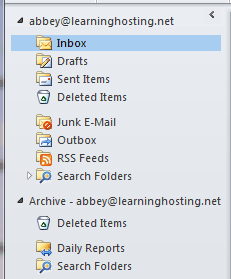
Once Archiving is activated for an account, the "Online Archive" section appears separately from the primary mailbox.
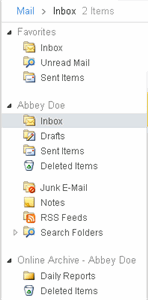
Just like the primary mailbox, you can also create custom folders in the Online Archive for organizational purposes.
Now let's enable the type of archive and retention policies available for your account. On the upper-right corner, click Options, followed by See All Options.
Click Organize E-mail on the left side, followed by Retention Policies along the top.
Retention Policies allow you to determine how long mailbox items are saved. For more information, click the ? icon on the upper-right corner.
Click + Add button to enable a policy for your account. You may enable multiple policies and apply accordingly.
A pop-up window appears with a list of the available policies (as set by the Exchange administrator).
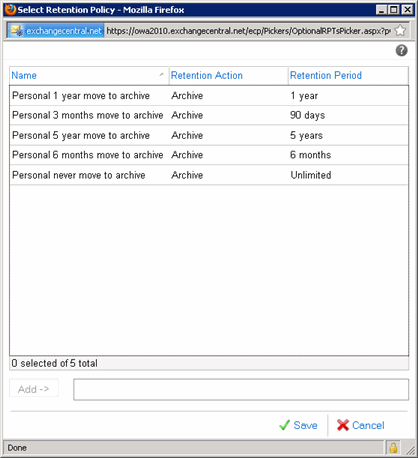
Click one or more (press CTRL key to select multiple policies) to enable and then click Add.
Click Save. Enabled policies can now be applied per mailbox item or for an entire folder.
To apply an enabled policy, return to the Mail page in OWA. You can either apply it to an individual e-mail message or to an entire folder. To apply a policy to a single e-mail, right-click on the message from the e-mail list and locate Archive Policy.
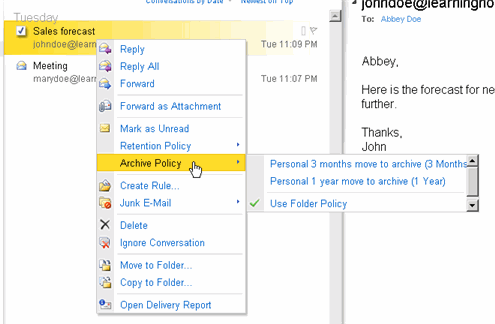
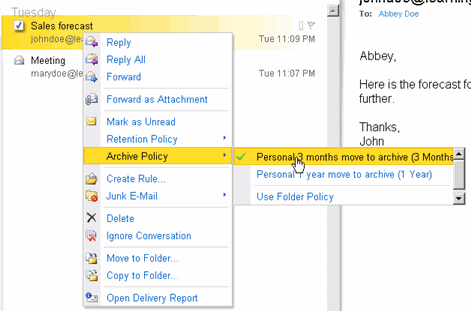
By default, "Use Folder Policy" is selected, which means that items in the folder automatically inherit the policy set for the folder. To select a different policy for a specific item, click the desired one. For example, for the "Sales forecast" e-mail message above, let's select the 3-month policy.
If a folder policy has been set for the folder in which this message is located, then the item-specific policy will override the folder policy, but all other items will retain the folder policy. If a folder policy has not been set and "Use Folder Policy" is selected, then it will automatically assume the policy set by the Exchange administrator.
To apply a different policy to a folder, right-click the folder and do as above. All items in the folder will assume the chosen policy.
NOTE: At any time, click the ? icon in the upper-right corner on any page in OWA to get content-relevant information about the functions and tools on that page.
Outlook 2010
Much like OWA, you can view and change the policy by right-clicking either a specific item or an entire folder. If you haven't already enabled retention policies, please do so using OWA (as described above).
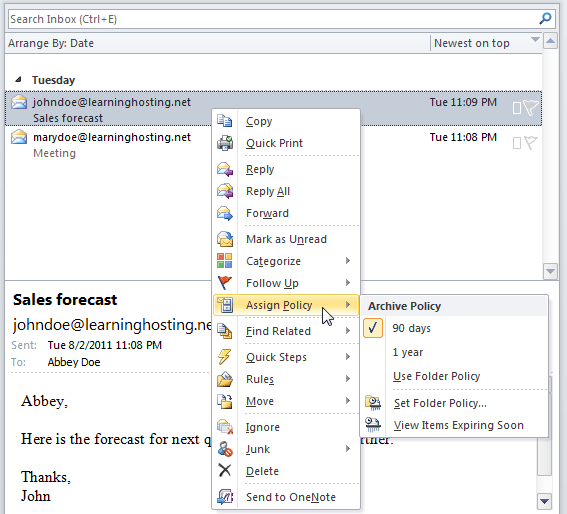
As you can see, the "Sales forecast" e-mail message in Outlook 2010 indicates that it uses the same 3-month policy that we set in OWA.
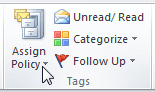
Alternatively, you can view and change the policy in Outlook 2010 by using the Assign Policy option in the Home ribbon.
The Assign Policy option can be used to set the policy for both a specific item and folder.
Just like OWA, the Online Archive section appears separately from the primary mailbox.
Legal Hold and Discovery (Exchange administrators only)
In addition to online storage of old or infrequently-accessed e-mail messages, another benefit of the Archive/Retention feature is Legal Hold and Discovery. Once an Exchange mailbox is enabled for archive and retention, all items - including edited or deleted e-mail - are stored for up to seven years. If your organization has set your Exchange account with Administrator-level access, then you may use the Multi-Mailbox Search tool to search for keywords across the entire organization.
User Notification of Legal Hold
An Exchange administrator can notify a user that his/her mailbox has been placed on Legal Hold.
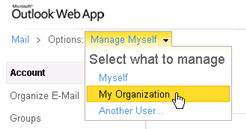
Log in to Outlook Web Access (OWA), click Options in the upper-right corner, followed by See All Options.
On the navigation menu at the top, click Manage Myself, followed by My Organization.
On the Users & Groups page, highlight the user's name and click Details. On the subsequent pop-up window, click Mailbox Features.
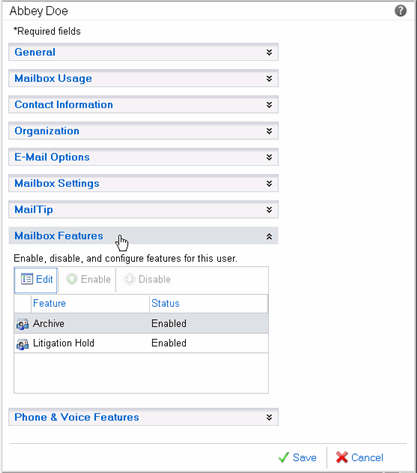
Next, click Litigation Hold and then Edit.
On the notification window, enter the message you wish to convey to the user and click OK.
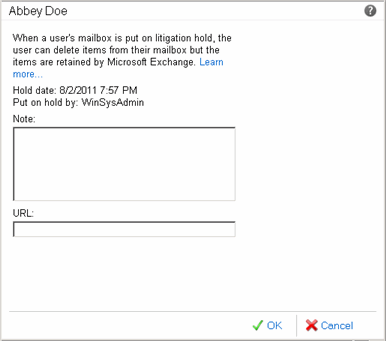
To learn more about Legal Hold and its impact on the user, click Learn more....
NOTE: At any time, click the ? icon in the upper-right corner on any page in OWA to get content-relevant information about the functions and tools on that page.
Discovery (Multi-Mailbox Search)
Return to the My Organization Options page as described above and click Mail Control on the left navigation menu, followed by Discovery.
To perform a keyword search, click New. On the Search window, enter a name for the search, keywords and other parameters as needed. Click Save.
To view the results of a saved search, click the search name. The results appear to the right.
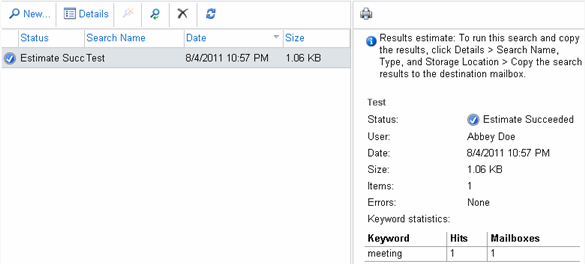
In this example, we named the search, "Test" and searched for the keyword, "meeting". The result shows the user's name, date of the item and size.
NOTE: At any time, click the ? icon in the upper-right corner on any page in OWA to get content-relevant information about the functions and tools on that page.
